Back Bridge - The Anti-Sitting Exercise?
It seems like everyone is familiar with the problems of too much sitting. From tight hips, weak glutes, forward head position, flexed wrists, slumping into poor posture and a lack of caloric expenditure it's easy to find reasons to hate on sitting.
So instead we opt for different ergonomically designed chairs. Or sit on stability balls (which still allow for all the same problems described above). We raise our desks so we have to stand to work at them. We drink more water to force us to stand every so often to use the bathroom. And some people have figured out the benefits of kneeling versus sitting.
But even if we change our work or study environment to eliminate sitting there are still times when we will have to sit. Unless you own a Pope-mobile or a Segway I'm sure your daily commute involves some sitting. As do certain meetings, meals in restaurants, nights out to the movies or theatre and trips to the bathroom.
If we can't eliminate all sitting from our lives maybe we should be incorporating more anti-sitting drills and exercises into our training? I think a lot of good coaches are already doing this by programming extra posterior chain work for the glutes and low back while putting the client in a kneeling or standing position.
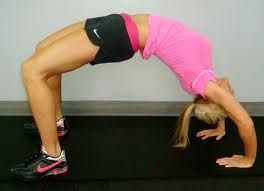
Is there anything else we could do to undo the effects of sitting? Sure and it's something most of learned how to do at a young age and it's the back bridge.
***short disclaimer...the back bridge requires high levels of mobility at the wrists, shoulders and hips and is not recommended for those with any type of pre-existing back condition...if you pass the clearance tests just described than feel free to try the easiest versions first and build up muscular endurance and mobility as you go***
[caption id="attachment_3755" align="alignleft" width="264"] The opposite of sitting - the back bridge.
So why is the back bridge the opposite of sitting? Well you are supporting your own body-weight rather than having it supported. The wrists are in an extended position rather than flexed over a steering wheel or keyboard. The chest and hips are open and the glutes are contracting.
***quick aside...for those that have difficulty with the rack position of a front squat this helps open up the wrists to allow them to extend more fully and support the barbell***
But this isn't the place to begin. Instead you should try and bridge with support. Then with less support. And eventually progress to bridging unsupported. Here are the 3 versions represented with pictures.
To do a back bridge with support start by sitting on a stability ball. Walk the feet forward to allow the upper body to roll down the ball. Continue until the entire length of the spine is in contact with the ball. Make sure to use a larger ball to start before progressing to a smaller ball. As well, keep the knees extended (straightened) when performing the bridge at first. When you feel more comfortable you can try a smaller ball and bring the feet in closer to the ball.
[caption id="attachment_3756" align="alignleft" width="300"] Easier version of back bridge with support
Once you are stretched out on the ball focus on breathing through your diaphragm. As you inhale imagine your back pressing into the ball to cover as much area as possible while your abdomen pressing towards the ceiling. Hold a breath momentarily then exhale and let your abdomen shrink back down away from the ceiling.
Besides focusing on your breathing you should also pay attention to your hips and shoulders. If you feel comfortable with your balance you can touch the tops of your quads and hips and try to imagine these muscles lengthening while going through your breathing patterns.
While you can roll your body forward and back during the drill, you want to ensure that your low back and neck are in contact with the ball at all times. If you can handle this position comfortably for a minute than go ahead and try a smaller ball and repeat the protocol as above. Just be aware that with a smaller ball the angle at the low back and neck will be greater putting you into a greater position of extension.
Once you feel comfortable with bridging on a ball for a minute you can try bridging against a wall. This is a nice way to transition from a bridge on a ball (with support) to one on the floor (without support).
And if you look at the image below and rotate it 90 degrees to the right it would look just like a back bridge on the ground.
[caption id="attachment_3757" align="alignleft" width="300"] Back bridge against a wall
A couple of points to share with you regarding wall bridges. The closer you are to the wall the more extended you need to be through the torso and hips.
If you found the ball version is too easy but the wall is too much try doing the wall version with a ball on a bench. Play around with the height to find out what works best for you but somewhere just below the shoulder blades works best for most people.
To do the wall bridge with a ball press the shoulder blades into the ball. Next reach the hands up towards the ceiling and back behind you towards the wall. Once the hands find the wall straighten the elbows as much as you can to generate a stretch. The head will be in a slightly extended (tilted back) position.
Once you can hold a back bridge for 30-60 seconds against a wall without support feel free to try from the floor. Again I'll remind you to ease into to this position. There should be no discomfort or pinching when performing the movement. Set a timer on your watch for short intervals e.g. 10 seconds and shoot for 3 reps to make 30 seconds. Rest one minute and repeat. In week two try for 2 sets of 2 reps 15 seconds and in week 3 try 2 sets of 30 seconds each.
If you are already using back bridges in your program tell me how you incorporate them into your training in the comments section. As well, feel free to post any questions there as well.
Chris [fb-like]
When you subscribe to the blog, we will send you an e-mail when there are new updates on the site so you wouldn't miss them.
Comments