The Importance of Ankle Dorsiflexion
Ankle dorsiflexion restriction is an important issue that can be easily missed or ignored in training. If not addressed, it can have a negative impact on sports performance and injury risk. From a weight room point of view where this can have the biggest impact is with your squat depth and mechanics.
Picture credit:https://www.t-nation.com/training/tip-squat-without-hip-pain
A common solution that I see is to raise the heels using plates. This helps bypass the needs for greater amounts of dorsiflexion at the ankle joint and usually results in instantly improved technique and greater depth. I love this option but it does not mean we should not work on improving the restriction at the ankle, especially with athletes. It serves as a crutch, and how wants to be on crutches their whole life?
From a sports performance point of view, limited ankle mobility can reduce power production in athletic movements such as sprinting and jumping. To get into optimal positions for acceleration (first phase in sprinting), an athlete needs to be able to get into greater degrees of positive shin angle. This is very challenging if you don’t have the required ankle mobility.
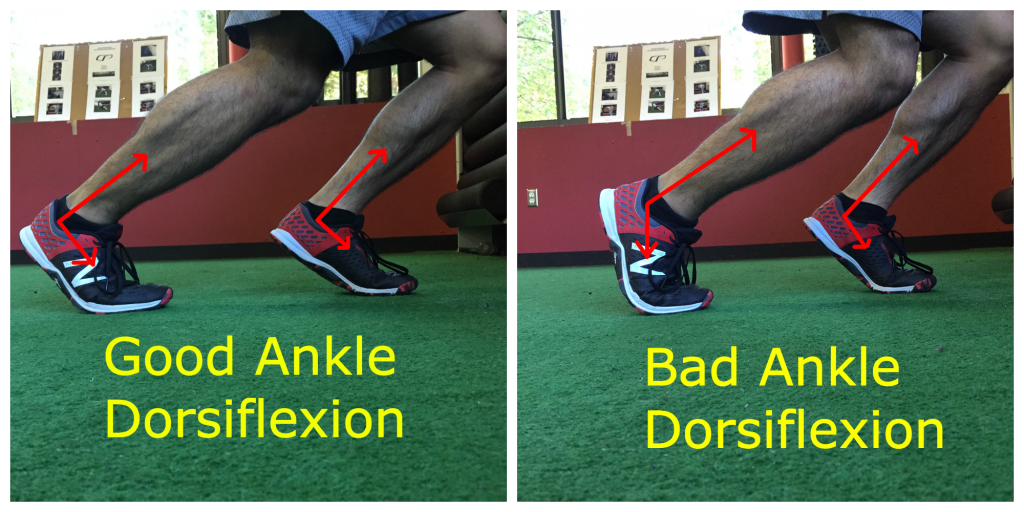
Picture credit:http://miguelaragoncillo.com/2016/01/20/4-methods-to-improving-speed-qualities/
The ankle joint can also act like a spring, helping the body to be propelled through space, such as a jump. The more you coil spring, the more force it is going to snap back with. So, the more an athlete can coil the foot (top of the foot coming towards the shin) the more force and energy transfer can be put into the floor (to an extent, there is a such thing as too much dorsiflexion).
Do you have an ankle restriction?
Step 1 checks to see how much dorsiflexion you have. For a demonstration visit the video link.
- Set up in half kneeling in front of the wall. This is with one knee down and one foot on the ground. Use a ruler or a tape measure and place it against the base of the wall. It is preferable to do this in bare feet.
- Stack your hands on your front knee and drive your toe towards the wall. Make sure the knee is going over the middle of the foot, the heel stays down and the same side hip does not pop out to the side. Otherwise it is a false positive!
- You are looking for around 10 cm of the knee passing the toes. If you’re +6 feet, look for 12 cm. Another quick option, which isn’t as precise, is to use your own fist as I show in the video.
What type of ankle restriction do you have?
Ok so you have a restriction…..what next? If you are familiar with the topic or have known for a while that you have an ankle mobility restriction, you have probably been told to foam roll your calf until the cows come home. While this can be a part of the process, we need to get specific to better understand whether the soft tissue or the joint issue.
It is a busy time we live in and the more dialled in we can get with option selection, the better, no need to throw paint at the wall and hope for the best.
To do this, here is a simple test you can try! See the video link for a demonstration.
- If you have access to a platform like the one in the video great, use this. If not no worries just use a bumper plate, some Airex pads and get creative if you have to. Place the ball of the foot on the platform and keep the heel on the floor.
- Keeping your knee straight, step forward and keep doing so just before the point where your heel has to lift. Now ask yourself, "Do I feel a pinch/lock in the front of the ankle or a stretch in the back of the calves".
- Repeat on the same leg, but now keep a good bend in the knee. Ask yourself the same question, pinch or stretch?
If both match up as a stretch in the back of the calf or ankle, then you might have more of a soft tissue restriction. If you match both with a pinch in the front, then you may have more of a joint restriction. If it was a mix then it’s a good idea to work on both.
Addressing ankle restrictions
Now it's time to start working on the restriction. Since not every restriction is created equal that means foam rolling on its own will not solve the problem. We need to match up the approach with the biggest contributor to the restriction. See the video link for a demonstration.
Soft Tissue Restriction (Video 1)
1.Foam roller/ Tennis ball work on the calf - Grab a foam roller and a tennis ball, roll all three spots as shown in the video for 30 seconds to a minute per spot.
2. Stretch the calf. Hold for 1-2 minutes with a straight leg, and 1-2 minutes with a slight bend in the knee.
3. Re-test and see if you gained more range of motion.
Joint Restriction
1. Grab a band and tie it off on a bench/ rack/ railing, etc. In a half kneel, place the band on the soft part right between your ankle and foot (see the video).
2. Keep the heel down and push your knee over the toe and 'pump the gas' 10-15 times. You can repeat this from 1-3 sets. If you do not have a band you can use your hands (see the video).
3. Retest and see if you gained more range of motion.
Mixed
Combine both Video 1 and 2 . Use joint restriction first then soft tissue restriction second.
A long term approach
Hopefully, you will see some change in range of motion during the retest. The problem is, the new mobility will start to go away fast, unless we facilitate motor learning and build strength in that new range of motion.
Calf raise variations (video 3)
Calf raises are good for more than just vanity. I show one option in the video but there are many options available. There are some big keys to get the most out of them.
- Full range of motion. We need to get all the way to the end range of your plantar flexion (pushing the top of the foot away from the shin, think ‘tippy toes’). A common mistake is a shortened range of motion or the heel go out to the side. To help with this, you can use a ball or block and squeeze in between the heels to ensure the heels do not pop out. Think about pushing the top of your head straight up to the roof and driving through your big toe.
- Slow Tempo. It is important to not rush this. Doing so can result in compensatory patterns while also using momentum to get through the range of motion. To help maintain and build strength in the new ranges of motion we also want to elicit as much blood flow into the area, going slow will help elicit a big pump and help you “feel it” where you are supposed to.
Perform 2-4 sets of 8-15 calf raises with a shorter rest period between sets (30-45 seconds) immediately after the joint restriction protocol matching your joint restriction. Play around with different variations single leg, bi-lateral, loaded with lower rep ranges, body weight with higher rep ranges, bent knees vs straight knees. A good place to start would be to do one day where you go heavier with lower rep ranges (8-10) and one day with lighter weights and higher reps (12+ to failure).
When to work on ankle restrictions
As a first option, you can do individual ankle mobility sessions on days off from regular training. This will only take about 10-20 minutes following the guidelines in the above sections.
The next option is to utilize the protocol as an extended warm up before your lower or full body days. There are a lot of advantages to doing it this way. Now you can utilize the new range of motion and integrate it into your lower body movements. Once we have those new ranges of motion it is important to learn how to use it in your movement patterns, remember….. use it or lose it!
If you are worried about doing this on your own, we can help you at Okanagan Peak Performance Inc. I know it can be daunting to do this on your own and if you're looking for help, the coaches at Okanagan Peak Performance Inc are there to help guide you through this. Come in and say hello or contact us to book your free strategy session today.
When you subscribe to the blog, we will send you an e-mail when there are new updates on the site so you wouldn't miss them.
Comments